How to build your own Wooden Kiln at Home
Presented by seedman.com and Joe Windham Enterprises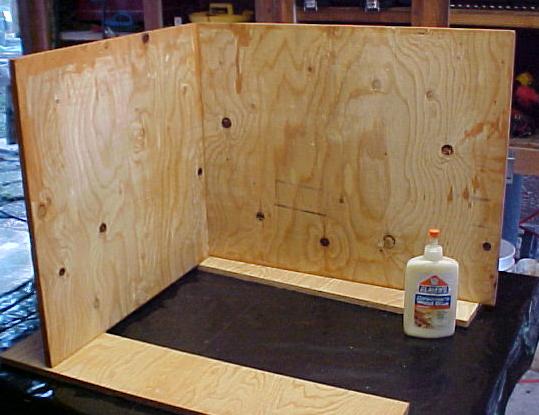 For those of you that would like to assemble
your own wooden kiln at home, we have put together the following instruction guide for you to use.
For those of you that would like to assemble
your own wooden kiln at home, we have put together the following instruction guide for you to use.The first thing you will need to do is decide what type of wood you will use. We recommend using ½ inch cabinet plyboard such as oak, or walnut, but others such as birch, cherry, etc. can be used. We are using fir in the pictures shown.
Once you have decided on the type of wood, it is time
to cut it into the correct size pieces. ( Note that many
lumber companies such as Lowes will cut your board for you at
a nominal fee, very handy if you do not own a tablesaw or
other means of making precise cuts ).
You will need the following size pieces of plyboard for
constructing a kiln with inside dimensions of 17x22
inches:
1 Ea. Top piece measuring 19 inches x 23 1/8
inches.
2 Ea. Side pieces measuring 18 inches x 22 inches.
2 Ea. End pieces measuring 18 inches x 19 inches.
1 Ea. Bottom piece measuring 18 inches x 22
inches.
Note, be sure to use wood glue on wood surfaces that
join together, this is a must!
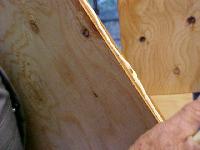
Apply a thin bead to each surface as shown. After joints have
been attached, some glue will usually be squeezed out, wipe
this off with a damp cloth before it dries, otherwise, it may
affect the outside finish of the kiln if you decide to use a
varnish or stain.
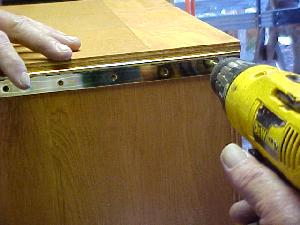
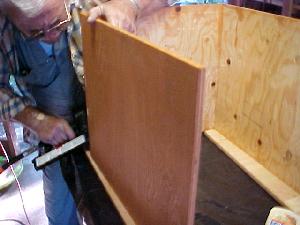 Plywood corners can be secured using a
braid gun as shown, or with wood screw or finishing nails.
Plywood corners can be secured using a
braid gun as shown, or with wood screw or finishing nails.
 After attaching the two end pieces and
the two sides together, add the bottom piece.
After attaching the two end pieces and
the two sides together, add the bottom piece.Now add the piano hinge to the top piece. Turn the top lid piece upside down and attach hinge to one side.
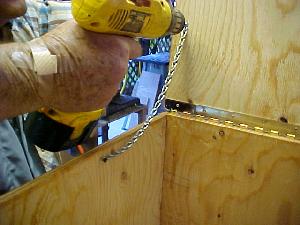
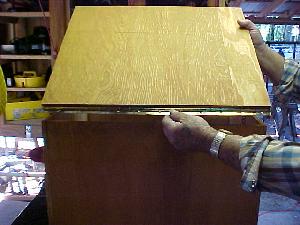 Now lay the top piece on top of the kiln
and attach the piano hinge to the back of the box as shown. ( you can pick it up at your local hardware store )
Now lay the top piece on top of the kiln
and attach the piano hinge to the back of the box as shown. ( you can pick it up at your local hardware store )
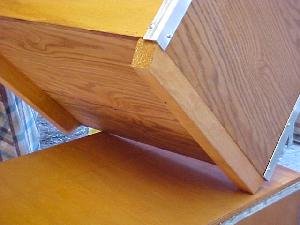
 Notice how the hinge fits under the top
lid piece and attaches to the back outside of the kiln.
Notice how the hinge fits under the top
lid piece and attaches to the back outside of the kiln.
 Now that the lid is hinged to the kiln,
attach the short chain that prevents the lid from opening back too far. ( you can pick it up at your local hardware
store )
Now that the lid is hinged to the kiln,
attach the short chain that prevents the lid from opening back too far. ( you can pick it up at your local hardware
store )
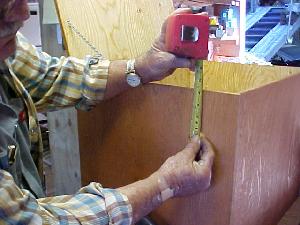 Now
it's time to measure and cut out the 1¾ inch hole for
the electrical plug. ( This type electrical plug is available
at any Electrical Supply store, we like the flush mount type
for convenience ). Measure a mark 4 inches down from the top
and 4½ inches over from the front.
Now
it's time to measure and cut out the 1¾ inch hole for
the electrical plug. ( This type electrical plug is available
at any Electrical Supply store, we like the flush mount type
for convenience ). Measure a mark 4 inches down from the top
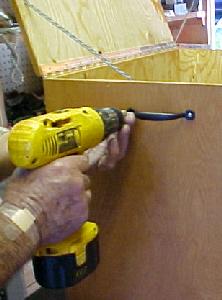
and 4½ inches over from the front.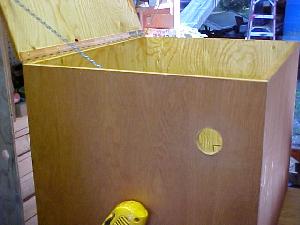 Drill
a 1¾ inch hole using a hole saw bit available at any
hardware store. A cleanly drilled hole is important.
Drill
a 1¾ inch hole using a hole saw bit available at any
hardware store. A cleanly drilled hole is important.
 Now
that the hole has been drilled, it is time to mount the
Electrical Control Assembly to the inside of the box.
Now
that the hole has been drilled, it is time to mount the
Electrical Control Assembly to the inside of the box.
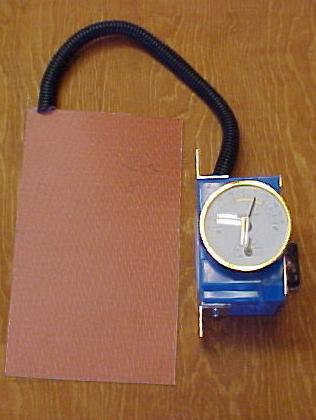
The Electrical Control Assembly is the heart of the kiln, it contains a 120 volt heating pad, an adjustable thermostat ( a hot water heater thermostat available at most hardware stores ), a hygrometer/thermometer gauge and the 120 volt male electrical plug assembly.
We’ve mounted all of this into a 4 inch square eletrical wall box found at any hardware store, but you can use any configuration you like.
 Notice
that on the backside of the Electrical Control Assembly, you
see the 120 volt male electrical connector. The end of a
standard electrical cord will easily plug into this. This
connector is aligned directly in front of the 1¾" hole
you have drilled into the kiln.
Notice
that on the backside of the Electrical Control Assembly, you
see the 120 volt male electrical connector. The end of a
standard electrical cord will easily plug into this. This
connector is aligned directly in front of the 1¾" hole
you have drilled into the kiln.
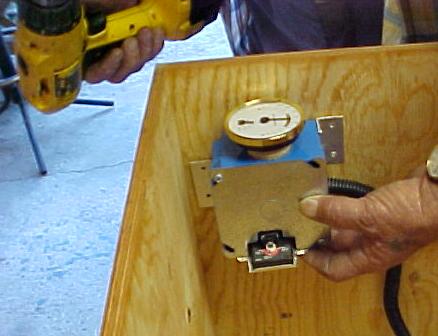 Attach
the Electrical Control Assembly to the inside of the kiln
with wood screws through the pre-drilled aluminum angle
brackets attached to the Electrical Control Assembly.
Attach
the Electrical Control Assembly to the inside of the kiln
with wood screws through the pre-drilled aluminum angle
brackets attached to the Electrical Control Assembly.
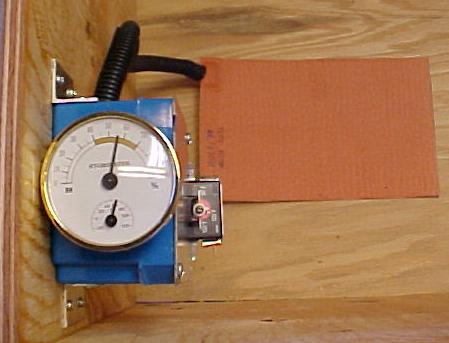 This
is a photo of the Electrical Control Assembly after it has
been installed. Notice the thermostat adjustment screw
mentioned earlier.
This
is a photo of the Electrical Control Assembly after it has
been installed. Notice the thermostat adjustment screw
mentioned earlier.
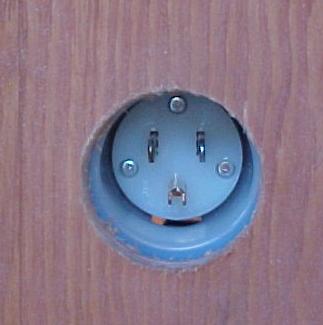 This
is a photo of the outside of the kiln showing the 120 volt
male plug.
This
is a photo of the outside of the kiln showing the 120 volt
male plug.
 Now
attach the handles to each end of the kiln. ( you can pick
these up at your local hardware store )
Now
attach the handles to each end of the kiln. ( you can pick
these up at your local hardware store )
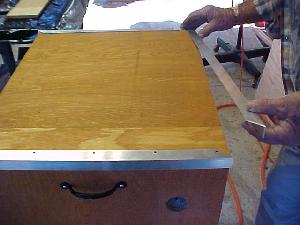 Now
attach 1 inch x 1 inch aluminum angle to the top of the lid.
You do not have to cut angles to 45 degrees as shown, a
square cut will work just fine. You will need to put angle on
the front and both sides of the lid, but not the back as the
piano hinge will provide enough strength there.
Now
attach 1 inch x 1 inch aluminum angle to the top of the lid.
You do not have to cut angles to 45 degrees as shown, a
square cut will work just fine. You will need to put angle on
the front and both sides of the lid, but not the back as the
piano hinge will provide enough strength there.
You will also need to add the aluminum angle to each of the outside corners ( see finished photo below ).
The angle adds strength to the box and helps prevent
warping due to the high heat and moisture inside the
box.
 We
recommend making a couple of inexpensive legs out of 2 inch x
2 inch lumber and attaching to the bottom of the kiln to keep
any heat from the kiln from making contact with finished
surfaces.
We
recommend making a couple of inexpensive legs out of 2 inch x
2 inch lumber and attaching to the bottom of the kiln to keep
any heat from the kiln from making contact with finished
surfaces.
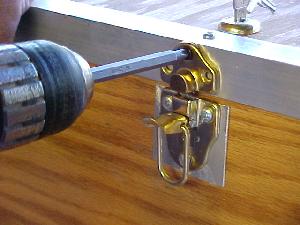 Now
attach the thumb clasp assembly to the front of the box. (
Available at your local hardware store ) You will notice that
we made a small aluminum filler plate to make the clasp flush
out with the front of the aluminum angle. This is for looks,
the clasp will work fine without doing this.
Now
attach the thumb clasp assembly to the front of the box. (
Available at your local hardware store ) You will notice that
we made a small aluminum filler plate to make the clasp flush
out with the front of the aluminum angle. This is for looks,
the clasp will work fine without doing this.
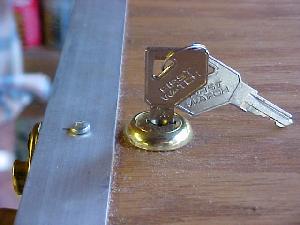 Drill
a ¾ inch hole and install lock assembly. ( you can pick
this up at your local hardware store, we recommend it for
those of you who have small children around )
Drill
a ¾ inch hole and install lock assembly. ( you can pick
this up at your local hardware store, we recommend it for
those of you who have small children around )
 Your
box is now ready!
Your
box is now ready!
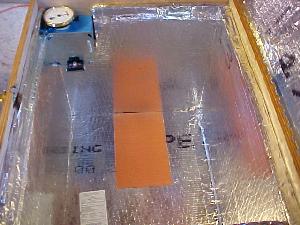
Insulation is an option, and one that we strongly recommend. The kiln will work without insulation, but it is much more efficient with insulation, plus it protects the wood from excessive moisture which will cause early rotting and warping.
We use 1" commercial air duct insulation ( same type material large air ducts in homes and commercial buildings are made from ), as it is not affected by moisture and heat. All corners are sealed with silver duct tape.
This insulation and tape can be purchased from
commercial heating and cooling supply companies, but can be
hard to locate in some areas.
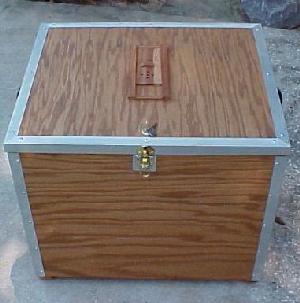 This
is a photo of a finished kiln that we have added a small
sliding air vent to the lid. This really is not necessary,
but you may want to do it for looks and convenience.
This
is a photo of a finished kiln that we have added a small
sliding air vent to the lid. This really is not necessary,
but you may want to do it for looks and convenience.
Excess moisture ( over 75 percent ) can be removed simply by leaving the lid cracked open slightly. Usually, the only time you have excess moisture is when you initially begin curing the tobacco.
This leads up to the question of a humidifier for
maintaining the 70-75% humidity required. Do you have to have
one?
No, you can actually control the moisture by placing a damp
towel or sponge at the bottom of the kiln and adding
distilled water as needed. But this requires daily attention,
and it is rather awkward.
You may want to buy one of the Oshkosh Humidors that hold 10
ounces of distilled water and has an adjustable top to
regulate moisture. Once you've used one, you will never want
to try anything else.
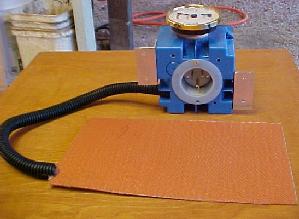
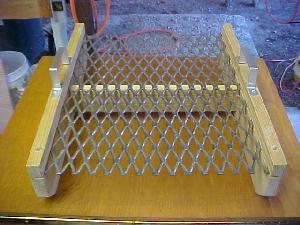 You
will need to make some type of tray for your kiln. The
purpose of the tray is to keep the tobacco from touching the
heating pad on the bottom and to allow an air space for heat
and air circulation.
You
will need to make some type of tray for your kiln. The
purpose of the tray is to keep the tobacco from touching the
heating pad on the bottom and to allow an air space for heat
and air circulation. This
is a photo of the tray setting in the bottom of the kiln,
notice that the heating pad does not make contact with the
wood. The center piece is notched to prevent contact.
This
is a photo of the tray setting in the bottom of the kiln,
notice that the heating pad does not make contact with the
wood. The center piece is notched to prevent contact.
Components for Building your own Wooden Kiln at Home
#M20 Electric heating pad
A commercial grade heating pad identical to the one showed photos above. It has 2 18” long leads. Must be hooked to a thermostat that you supply. ( a standard hot water heater thermostat will work fine, and can be found at almost any hardware store ). 120 volt, 100 watt. Measures 6" x 10".
Note, this item is no longer available. The price just got way out of hand. A few years ago, Birk Manufacturing offered this for 24.95 each, then it went to 48.95, then to 64.95 and our last quote was for 106.95 per pad. There are much cheaper alternatives out there.
One of our customers told us he used a Auto Oil Pan Heating Pad from Jegs Automotive Supply and it worked just fine, and only cost about $55.00. ( Note: We had another customer tell us he purchased this pad and it did not work for him, so do so at your own risk, we are only trying to pass on helpful info here )
We are on the search for economical heating pads, if you find a source, please E-mail us and let us know and we will pass the info on to other customers.
A note from one of our customers:
The humidifier sits in the bottom of the kiln, below the stainless steel mesh tray, about center.
This humectant/preservative is the same additive used to make the special care solutions used in most cigar humidors. Simply add a half ounce of this to the distilled water ( about 9 ounces ) in the humidifier to help prevent mold and encourage even humidification. One bottle will last for several curing processes.
What to expect from your Home Tobacco Kiln
On average, you can expect to cure a little over 2 kilos ( about 5 pounds ) of tobacco at a time over a 3-4 week period.
Each commercial king size cigarette usually contains a
little less than a gram of tobacco each. This means that you
can expect to cure enough tobacco for about 2,500 cigarettes
each time.
The kiln can be used continuously, meaning that you can start
curing a fresh batch of tobacco the same day you remove a
cured batch. You can kiln cure tobacco that has been air
drying for months. We mention this because you may wish to
cure tobacco for your neighbors or community and recover some
of your cost for the kiln. If you do charge to do this, make
sure you abide by your local, state and federal laws.
How much does it cost to produce a carton of cigarettes better than store brands? We get asked this a lot, and here is a general answer:
1. In order to start processing your own tobacco, you will need the following equipment: A kiln, a cutting machine, and a rolling machine .
2. Once you have these items and your first crop of tobacco, all you will need to purchase for cigarette production is flavoring, filters and papers. If you use a rolling machine that uses filters, the cost of filters and papers will run about $5.85 a carton. Adding flavoring ( we strongly recommend this ) will add about a $1.00 to the cost or a total of just under seven dollars a carton for filter cigarettes, or just under five dollars a carton for non-filtered cigarettes.
3. We did not include the cost of the kiln, cutting
machine and rolling machine as this should be absorbed over
the length of time you process your tobacco. If you currently
pay $25.00 a carton for cigarettes, and smoke a carton a
week, you would realize a savings of about $936.00 a year (
probably more since you will not be paying you local and
state taxes on this as you do store bought cigarettes ).
Of course this savings will only get larger each year,
because prices are only going to go up on cigarettes, not
down.
We must stress that the real savings is to your health, as you will not be consuming the thousands of additives that are added to commercial brands.
How to use the kiln for Herb Drying
Herbs should be collected just before they bloom. Collect
herb leaves in the afternoon after all dew has dissappeared.
Make sure to shake herbs and remove any insects, dirt, etc.
It is preferrable not to wash herbs, but if you must, lightly
rinse herbs and spread leaves to dry until all visable moisture
has disappeared.
Place herb leaves lightly into cotton gauze bags or
pillowcase and set on top of the mesh tray at the bottom of the
kiln.
Leave the top lid of the kiln blocked with something so that
the lid will not completely close, but instead leaves about a
one inch gap at the front of the kiln when the lid is closed.
This is for moisture release. Plug in the kiln and let set for
12 hours. Then remove the bag(s) of herbs, stir the leaves so
the leaves that were in the center are now on the outside, and
place back into kiln.
Inspect and stir leaves every 12 hours until leaves are dry and crisp, they are now ready for use. Small herb leaves can dry in as little as 24 hours, larger leaves may take 2 days or longer.

Contact Us | Privacy Policy | About Us
Serving gardeners since 1992
State of Mississippi Seedmen's Permit #C-391, Ohio 90152, Minnesota 20086777